
It’s pretty common in my neck of the woods for people to hang strings of low-wattage unfrosted lamps around their backyard or patio, to provide a little ambience. So when my general manager suggested that she really wanted some for her birthday, I said “Okay – but can you just wait a little bit? I think I can do better than store-bought lights.”
Her birthday came and went – the lights were still a work in progress. So when my general manager suggested that she really wanted some for our anniversary – “Okay – but can you just wait a little bit…?”
Our anniversary came and went – the lights were still a work in progress. So when my general manager suggested that she really wanted some for Christmas, and that perhaps she should ask the kids to get them instead, I knew I had to commit. The result was these addressable RGB lights. Each and every one of the 120 lamps can be turned on and off or have its color tweaked, completely under software control, and the string can be lengthened or shortened at any time with no tools.
Why design my own?
This comes back to one of our guiding principles. I could have bought RGB lights from some company on Amazon that no one has ever heard of – and there are plenty to choose from! But if you read the comments and reviews, it’s clear that you can only operate these from an app that the company provides. They are not exactly open source, so if the company’s app doesn’t do what you want – or the company disappears and the app doesn’t work with the next rev of Android or IOS – you wasted your money and the lights are headed to a landfill.
Besides, I decided there was room for improvement and just a little extra expressiveness.
Voltage Drop
If you are talking about a five or ten foot string of lights, they’ll probably work fine. But when you are trying to push current through 120 feet of copper wire – which was my plan – then you can’t design without taking voltage drop into account.
Copper is not a superconductor: it has a small but finite resistance. The thinner or longer (or both) that it is, the more resistance it has. This means that if you design to provide the regulated 5 volts required by most addressable RGB LEDs, the first lamp will get 5V as expected – but 120 feet later, the last lamp will be lucky to get 3 volts, unless you are using REALLY heavy copper wire.
This happens with the 14 and 12 gauge wire in your house too. However, when there is a 2V drop on a 120VAC circuit, most devices are not disappointed to get only 118 volts. The same 2V drop on a 5V circuit is a much bigger problem.
You might notice that the lights on sale most places also offer ‘repeaters’ or other ways to daisy-chain short strings into longer runs. Voltage drop is the primary reason why.
To solve this problem, I actually carry two separate voltage rails along the length of the light string. There is an unregulated 12V supply available to all lamps. If I wanted to, I could put a separate 5V step-down regulator inside each individual lamp… but there is some cost to that. Instead, I put a 5V step-down regulator into one of every ten lamps or so. That regulator is enough to power its own lamp as well as the next eight or nine lamps in the series. In essence, the string has its own built-in daisy-chaining mechanism. Any lamp anywhere along the path can be a repeater; no other special wires or accessories are needed.
Control
To operate the string of lights, I used a Quadboard – a four-module NanoSlot host – along with an RGB LED controller module and an ambient light sensor. The sensor enables the light show to begin every day at dusk.
There are two vacant slots in the patio light controller, so I’d like to add a wifi/Bluetooth module and allow the lights to be controlled from a smartphone. More about this in a future update.
3D printing marathon
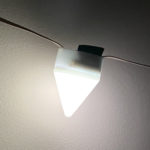
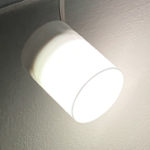
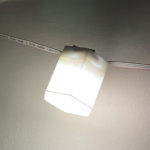
For more of a whimsical, festive vibe with these lights, I 3D printed the lamp diffusor lenses in various shapes – cubes, cylinders, cones, stars, and so on. I started by printing them in white ABS, but then I decided to switch to PLA, and honestly it is very hard to tell which ones are which, so I recommend PLA for its simplicity to handle and print for this project.
Why did I choose white instead of clear? Each LED is actually three different elements – one each of red, green, and blue. I did some test prints with clear lenses, and the RGB colors refracted right thru, instead of providing a single uniform color. The white lenses provide better diffusion and make the lighting much more uniform.
To seal the lamps against the environment, I printed some caps using white TPU. They fit snugly but can be removed easily.
You can download the CAD files for free from my Tinkercad site by following the links below.
Stay tuned…
Eventually all of the information you need to make these lights yourself – schematics, bill of materials, layout artwork, source code – will be available for free on this site.
I will also continue this article with more info about controlling the lights and writing apps for them. Keep checking back!